
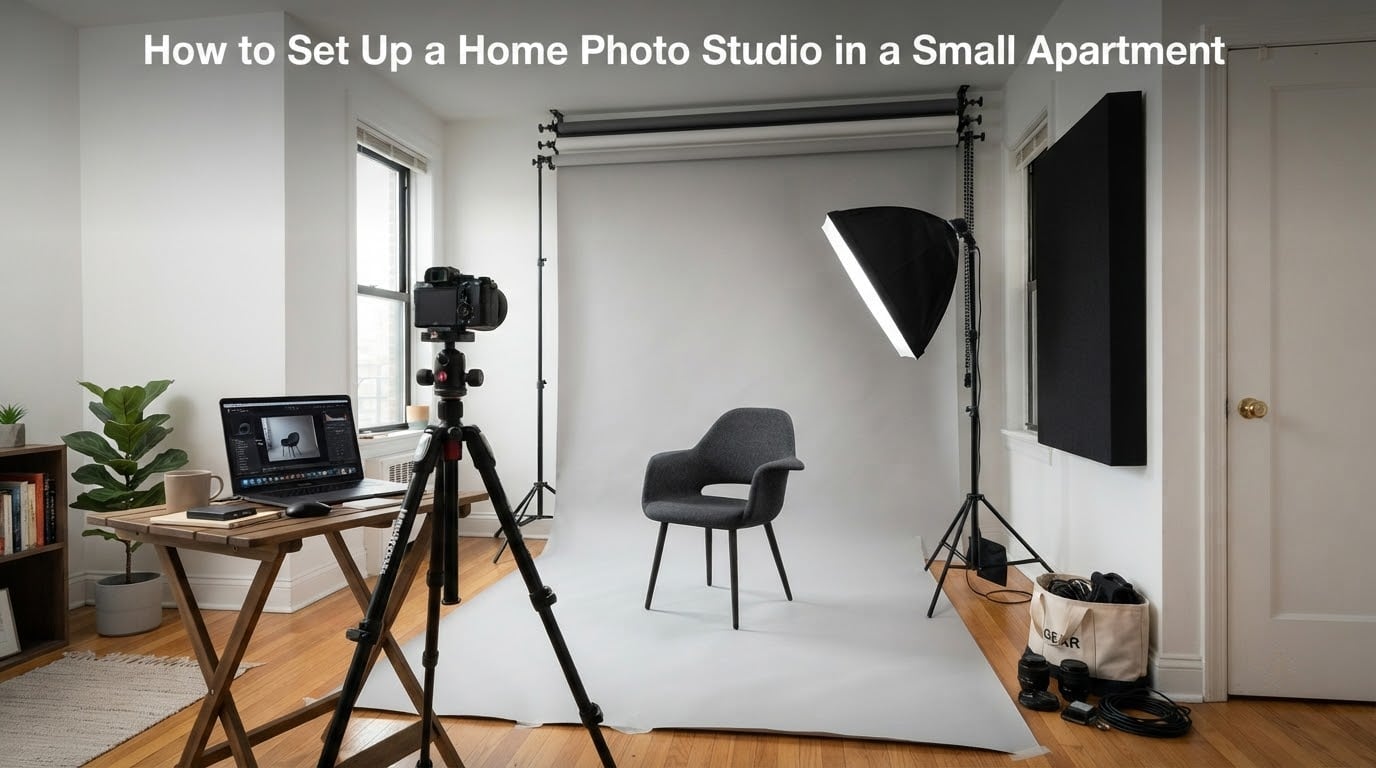
A home photo studio in a small apartment needs about 6 by 8 feet of clear floor, a 7-foot ceiling, and 8 to 10 feet of shooting depth. That is enough for portraits, headshots, and product work. The constraint in a rented flat is controlling bounce, not having more space.
Most small-apartment studio advice skips the part that actually decides whether your photos look professional: how close the light sits to your subject, and how much you stop it from hitting the walls. Get those two things right and a one-room flat produces cleaner results than a large room with a cheap setup.
I have built and shot in setups no bigger than a living room corner, and the pattern holds every time. One light, one modifier, one backdrop, and everything else stored away. Below is how to set up a home photo studio in a small apartment in the order that actually saves time and money.
Table of Contents
- What “Small” Actually Means: Minimum Footprint and Ceiling Height
- Pick Your Corner, Then Clear It
- The Backdrop: Wall, Paper Roll, or Vinyl
- Lighting in a Small Room Comes Down to Distance
- Light Modifiers That Actually Fit
- Controlling Bounce and Light Spill
- Camera, Lens, and Tripod in a Tight Room
- Camera Settings for a Small Room
- Storage That Disappears When You Are Not Shooting
- Apartment Reality: Lease, Neighbors, Windows, and Safety
- What to Buy First (and What to Skip)
- What Not to Shoot at Home
- Your First Shoot in a Studio Apartment, Step by Step
- Frequently Asked Questions
- What is the minimum size for a photography studio?
- How much does it cost to set up a photo studio?
- How can I set up a DIY photo studio at home?
- What size softbox do I need for a small room?
- How do I stop light bouncing around a small room?
- Do I need permission from my landlord to run a photography studio in my apartment?
- How do you keep a small studio from taking over your apartment?
- Conclusion
What “Small” Actually Means: Minimum Footprint and Ceiling Height
The minimum workable footprint is 6 by 8 feet of empty floor, with a ceiling of at least 7 feet. For full-length portraits you want 8 to 10 feet of clear depth between the camera and the backdrop, and a 50mm or longer lens to make that distance work.
Here is the short spec block:
- Clear floor area: 6 ft by 8 ft minimum, measured with furniture removed
- Ceiling height: 7 ft minimum, 8 ft or more is comfortable for light stands
- Clear depth for full-length frames: 8 to 10 ft
- Backdrop width: a 2.08 m (about 6 ft 10 in) roll covers a standing subject with room to spare
- Lens: 50mm to 85mm on full frame; 35mm to 50mm on a smaller sensor
- Outlets: at least one reachable outlet on the shooting wall
If your room is narrower than 6 feet, you can still shoot headshots and product work. You just cannot get a full-length frame without angling across the room diagonally. Measure before you buy anything, because the diagonal is often the space that saves you.
Pick Your Corner, Then Clear It
Choose the corner with the fewest windows and the most solid wall. Daylight from two directions is the hardest light to tame, and a solid wall gives you somewhere to hang a backdrop without drilling into anything structural.
Clear the floor completely. Every piece of furniture becomes a bounce surface, and a sofa two feet behind your subject will soften and flatten everything you do. Move it out of the room if you can, or push it into a far corner and cover it.
Set a ten-minute pack-down rule from the first session. Everything lives in one tote or one rolling cart by the door, and resetting means putting that tote back, not rebuilding the set. Photographers working from a rented flat repeatedly describe the same thing: the setup has to be reversible or it slowly takes over the apartment.
Face the corner where two walls meet. That is your backdrop wall, and everything else in the room works for you only if it is behind the camera or well outside the frame.
The Backdrop: Wall, Paper Roll, or Vinyl
A plain painted wall is the cheapest backdrop and it works for headshots, casual portraits, and any look you want to be soft and low-contrast. Its limits are texture, color cast, and clutter you cannot remove.
Seamless paper on a roll is the most versatile option for a small room because it sweeps from wall to floor with no visible seam. The 2.08 m roll, sometimes sold as a car-size backdrop, is the apartment sweet spot: wide enough for a standing subject, short enough that the paper core and stand stay inside the room instead of stretching across the hallway.
Hang the roll without a floor stand and you solve two problems at once. A tension rod or curtain pole across two walls holds the roll directly, and a wall-mounted roller system does the same job permanently with no floor space. Both leave the floor clear, which matters more in a small room than almost any other gear decision.
Matte paper kills reflections when you use flash. Glossy or satin finishes put a hotspot on the background, and vinyl that is too shiny does the same thing.
Pick vinyl instead when you shoot food, liquids, makeup, or anything you need to wipe clean. Paper wrinkles permanently and cannot be cleaned, so cream products and spilled coffee end the roll. If you shoot mostly people, paper is the better buy.
Lighting in a Small Room Comes Down to Distance
Light falls off with distance, and the closer you place the light to your subject, the faster it falls off. That sounds like a disadvantage but in a small room it is the main advantage you have.
Here is the practical consequence, in plain English: when a light is far away, its falloff is gradual, so the light spreads across the whole room and hits every wall. When the same light is 3 to 4 feet from your subject, the falloff is steep, so almost none of it reaches the walls. Bounce falls off with the direct light.
So the single most useful technique in a small apartment is not a bigger or more expensive light. It is a smaller, cheaper light moved close.
Continuous LED panels are the easiest start because you see exactly what you get. The tradeoff is that they run hot, they draw power continuously, and they put out a constant wash across the room that is harder to shape.
Flash or strobe gives you the inverse square law on your side. The light is off until you fire it, so the room’s ambient light does not compete with it, and you can push the power up without melting the space. A hybrid strobe gives you both, using continuous for framing and flash for the final exposure.
Position the key light at roughly 45 degrees to one side of your subject, slightly above eye level, close enough that the modifier is well clear of the frame. Check that the light is not reflected in any mirror or glossy surface in the room before you start.
If you have no light at all, a window works. Hang a sheer curtain or a white sheet across it to diffuse the daylight, and put your subject about 6 feet away facing the window. Keep the window in view of the subject but out of frame, or you will fight flare all session.
Light Modifiers That Actually Fit
Modifier size is a room-size question, not a budget question. A large soft source is softer, but in a small room it becomes a wall you are shooting into. Match the modifier to the space you have.
A 65 cm octabox is the sweet spot for a bedroom or one-room flat. It gives a round catch light in the subject’s eyes, spreads enough light to fill a face, and still leaves room to move the light around. A 90 cm octabox gives noticeably softer light and cleaner falloff, and it needs about a foot more depth to work without the subject walking into it.
Strip softboxes are worth more attention in small rooms than most guides give them. A strip light throws a narrow band of soft light that reaches your subject without washing the wall behind, and a strip pointed downward or across the room is an efficient way to keep spill down.
Grids and honeycomb grids are the cheapest spill control you can buy. A grid narrows the beam so light lands on the subject instead of the ceiling and the neighbouring wall, which is exactly the problem in a low-ceilinged room.
You can also build a modifier. White foam board leaning on the wall opposite the light bounces soft fill back at the subject’s shadow side, and it costs almost nothing. It also collapses flat and stores against a door.
Keep the key light high enough to clear the backdrop and angled so the light does not hit the paper behind your subject. Spill on a light background is the fastest way to lose contrast.
Controlling Bounce and Light Spill
Bounce and spill are different problems beginners confuse. Bounce is light reflecting off your walls, ceiling, and floor back at the subject. Spill is light leaving your modifier in a direction you did not intend. Fix bounce with surfaces, and fix spill with direction.
Four steps, in this order:
- Move the light closer. Halving the distance quadruples the light on the subject and cuts what reaches the walls dramatically.
- Flag the surfaces. Hang black fabric, black foam board, or even dark bedding on the wall behind the light so nothing reflects back.
- Add diffusion or a grid. A grid controls spill direction; a diffusion panel or softbox controls source size.
- Re-meter. Moving the light changes exposure. Check your meter before you change anything else.
White walls are an asset or a liability depending on your look. For a bright, airy, high-key set they act as a giant bounce and give you soft fill for free. For a moody set with dark background and strong contrast, every white surface is working against you.
Decide the look first, then decide what to do with the walls. Painting rented walls is usually a lease violation, so the renter-friendly version is removable black cloth on command strips or a blackout blind over the window.
Blackout blinds are the highest-value single item in an apartment studio. An uncovered apartment window is an uncontrolled light source with a color temperature that shifts through the day, and it will fight every setup you build.
Camera, Lens, and Tripod in a Tight Room
Focal length is how you survive a small room. A 50mm or longer lens keeps you far enough back that faces stay natural and straight lines stay straight. A wide lens forces you close, and close wide-angle stretches the edges of the frame and the edges of your subject’s face.
For full-length portraits against a rolled backdrop, 70 to 85mm is the useful range. It compresses the gap between your subject and the paper so the background stays large and clean behind them.
On a smaller sensor, the equivalent field of view is shorter. A 35mm on an APS-C body gives roughly the same framing as a 50mm on full frame, so work out your equivalent focal length before you buy.
Use a tripod rather than a full-size light stand for the camera. It is steadier, takes less floor space, and lets you shoot tethered or on a timer in a room where you cannot step back to check the frame. A C-stand with a sandbag is the right tool for holding a reflector, a flag, or a second light, not for the camera.
Tethering pays off in a small space because you stop leaning forward to check the screen. A laptop on a folding table in the corner gives you review and capture without a second screen or a dedicated desk.
Camera Settings for a Small Room
Small rooms need faster apertures and higher ISO than people expect. Open up to f/2.8 or wider to get enough light and shallow depth of field from a single source, then let ISO handle the rest.
With continuous light, keep shutter speed at whatever your camera needs to expose correctly, ideally 1/125 or faster to protect against movement. With flash, your shutter speed sits below your camera’s sync speed unless you use high-speed sync, because the flash duration is what actually freezes motion.
Set a custom white balance rather than leaving white balance on auto. Shoot a grey card or a white sheet under your setup, set the custom value from it, and your color stays consistent across a session even if the light drifts.
Turn off any auto ISO and auto ISO maximum. In a small room the light changes every time you move a stand, and letting the camera choose exposure mid-session makes your series inconsistent.
Storage That Disappears When You Are Not Shooting
The gear you own is not the problem in a small apartment. Where you put it between shoots is the problem.
Wall hooks and a rail keep light stands, tripods, and C-stands vertical and off the floor. A ceiling track or a wall-mounted boom arm removes the last floor stand entirely, which is the single biggest space saver in a small room. Boom arms are worth the extra cost if you shoot in the same corner every time.
Modifiers that collapse or nest are worth more than rigid ones. A collapsible octabox with a speedring folds into a bag you can put on a top shelf instead of a stand you have to walk around.
A single rolling cart or a stack of totes near the door handles the rest. Cable coils, sandbags, and clamps go in one tote, backgrounds in another. Labelled totes make the ten-minute reset realistic.
Store backdrop rolls vertically, not rolled up, and support the paper core so it does not crease. A roll creased on the floor stays creased when you hang it.
Apartment Reality: Lease, Neighbors, Windows, and Safety
None of the studio guides cover this, and in a rented flat it can decide whether you keep shooting. Read your lease for anything restricting commercial activity, home businesses, or increased foot traffic. Some landlords want written notice, some prohibit it outright, and many never look at all until something goes wrong.
Tell your landlord in writing before you start. A short email describing occasional client photos, once a week, with no changes to the property, gives you a record and often resolves the question in one exchange.
Noise discipline matters more than people expect. Video recording is louder than stills, so keep video sessions inside normal hours, avoid recording on the shared wall side of the unit, and avoid anything that carries below speech level such as music playback for a model. Portrait and product work is quiet enough that neighbours rarely notice it exists.
Light discipline is the version most people forget. If your window or your light spills into a neighbouring unit at night, that is a genuine problem. Keep shooting during daylight hours, close blackout blinds rather than aiming lights out of them, and check that no direct beam escapes through a window behind your backdrop.
Do not hang heavy gear from a drop ceiling. Acoustic tiles and T-bar grids are not rated for loads and can fail. Use a structural ceiling or mount to a wall stud, and confirm that any drilling is permitted before you start.
Watch the heat. Continuous LED panels in a small closed room add noticeable warmth, so ventilate during longer sessions and do not leave them running unattended. Route cables along walls and under a rug edge so nobody trips, and keep your ladder work to daytime when the building is quiet.
What to Buy First (and What to Skip)
Buy in this order. Each item unlocks the next, and you can stop after any step and still have a working setup.
- One light. A single strobe or a quality LED panel. Everything else is optional until this exists.
- One modifier. A 65 cm octabox or a strip softbox with a grid. It sets your light quality and controls spill at the same time.
- One backdrop plus a holder. A 2.08 m paper roll on a tension rod or a wall-mounted roller system. Floor stands are optional.
- Blackout treatment. Blinds plus black fabric for the wall behind the light.
- A tripod and a tether cable. Stability and faster review.
- Storage. Wall hooks, a cart, and totes. Do this before you buy the next piece of gear.
Skip these at the start. A second light, because one light you fully understand beats two you do not. Expands and octaboxes larger than your room. A rolling paper rack, which solves a floor-space problem in a large studio and creates one in a small one. Ceiling-mounted gear, until you know you will shoot in the same spot for months.
Do buy a cheap grey card, a reflector, and a set of sandbags. Small, cheap, and each one prevents a problem you cannot solve after the fact.
What Not to Shoot at Home
Some work genuinely does not fit a small apartment, and recognising it early saves you time and money.
- Large group shots. You need the floor area and the depth to back up.
- Sets that need side light from several metres out. There is no room for falloff.
- High-volume e-commerce catalogues. The time lost resetting a one-room set per batch outweighs the studio savings.
- Full-length work on a wide lens. If the room is too tight, rent studio time for those jobs.
Most working photographers do both. A small home setup handles headshots, small-business content, product shots, and flat lays all week, and they rent a proper studio for the bigger client jobs. Threads on photography communities repeatedly describe exactly this hybrid pattern.
Your First Shoot in a Studio Apartment, Step by Step
Total time is roughly 45 minutes including pack-down. Work through these in order and the first frame you take will already be close.
- Clear the corner. Move every piece of furniture out of a 6 by 8 ft area and clear the shooting depth behind your camera.
- Close the windows. Put up blackout blinds so daylight stops competing with your light.
- Hang the backdrop. Mount a tension rod or a wall roller, hang the 2.08 m paper roll, and smooth the top edge flat.
- Position your subject. Place them 5 to 6 ft in front of the backdrop, standing mark set with tape on the floor.
- Place the key light. Put the light 3 to 4 ft from your subject at 45 degrees and slightly above eye level, with the modifier aimed at the face and torso.
- Flag the spill. Hang black fabric on the wall behind the light so nothing bounces back, and add a grid if the beam is reaching past your subject.
- Add fill. Put a white foam board reflector on the shadow side, close enough that the shadow side is a stop or two under the key.
- Set the camera. Mount on a tripod with a 50mm or longer lens, aperture wide open, flash below sync speed, custom white balance set from a grey card.
- Meter and test. Take one frame, check the histogram, adjust power on the light rather than changing aperture.
- Shoot, then pack down. Work through your look list, then reset the room in ten minutes using your tote system.
Frequently Asked Questions
What is the minimum size for a photography studio?
A home photo studio needs about 6 by 8 feet of clear floor, a ceiling of at least 7 feet, and 8 to 10 feet of depth for full-length portraits. A 50mm or longer lens makes a tight room work because it lets you stay back far enough to keep faces natural. Rooms narrower than 6 feet still work for headshots and product work.
How much does it cost to set up a photo studio?
It depends entirely on the tier you start in. A bare-bones setup is one light, one modifier, one paper backdrop, and a rod to hang it. A standard setup adds blackout treatment, a tripod, a tether cable, and wall storage. A serious setup adds a second light, a boom arm, and better modifiers. Most beginners spend on the light and modifier first and let the rest follow.
How can I set up a DIY photo studio at home?
Clear one corner, hang a backdrop on a tension rod or wall-mounted roller, place one light 3 to 4 feet from your subject at a 45 degree angle, flag the wall behind the light with black fabric, and shoot with a 50mm or longer lens on a tripod. Keep everything in one tote so the room resets in ten minutes.
What size softbox do I need for a small room?
A 65 cm octabox is the best starting size for a bedroom or one-room flat because it gives a round catch light and still leaves room to move the light. A 90 cm octabox is softer but needs about a foot more depth. A strip softbox with a grid is efficient in tight rooms because it controls spill direction.
How do I stop light bouncing around a small room?
Move the light closer to your subject, because light falls off faster at short distances and less of it reaches the walls. Then cover the wall behind the light with black fabric, add a grid or diffusion to control spill, and re-meter because the exposure will have changed. White walls instead work in your favour for a bright high-key look.
Do I need permission from my landlord to run a photography studio in my apartment?
It depends on your lease, so read it first for clauses about commercial activity, home businesses, and foot traffic. Where it is unclear, a short written note describing occasional client sessions usually settles the question. Keep the property unchanged, shoot inside normal hours, and keep window light and noise contained.
How do you keep a small studio from taking over your apartment?
Treat the setup as reversible. Store every stand, modifier, and backdrop in one tote or a rolling cart by the door, set a ten-minute pack-down rule from the first session, and use collapsible modifiers and wall hooks instead of permanent floor stands. If resetting means rebuilding the set each time, the system will not survive contact with a real week.
Conclusion
To set up a home photo studio in a small apartment, you need 6 by 8 feet of clear floor, one light placed close, a backdrop that hangs from the wall or a rod, and gear that packs away in a tote. Light position and bounce control do more for your images than any expensive addition to the kit.
Start with the corner you can clear completely, take one test frame, and fix the first thing that looks wrong. Most of the time it will be the light being too far back or the wall behind it bouncing too much.