
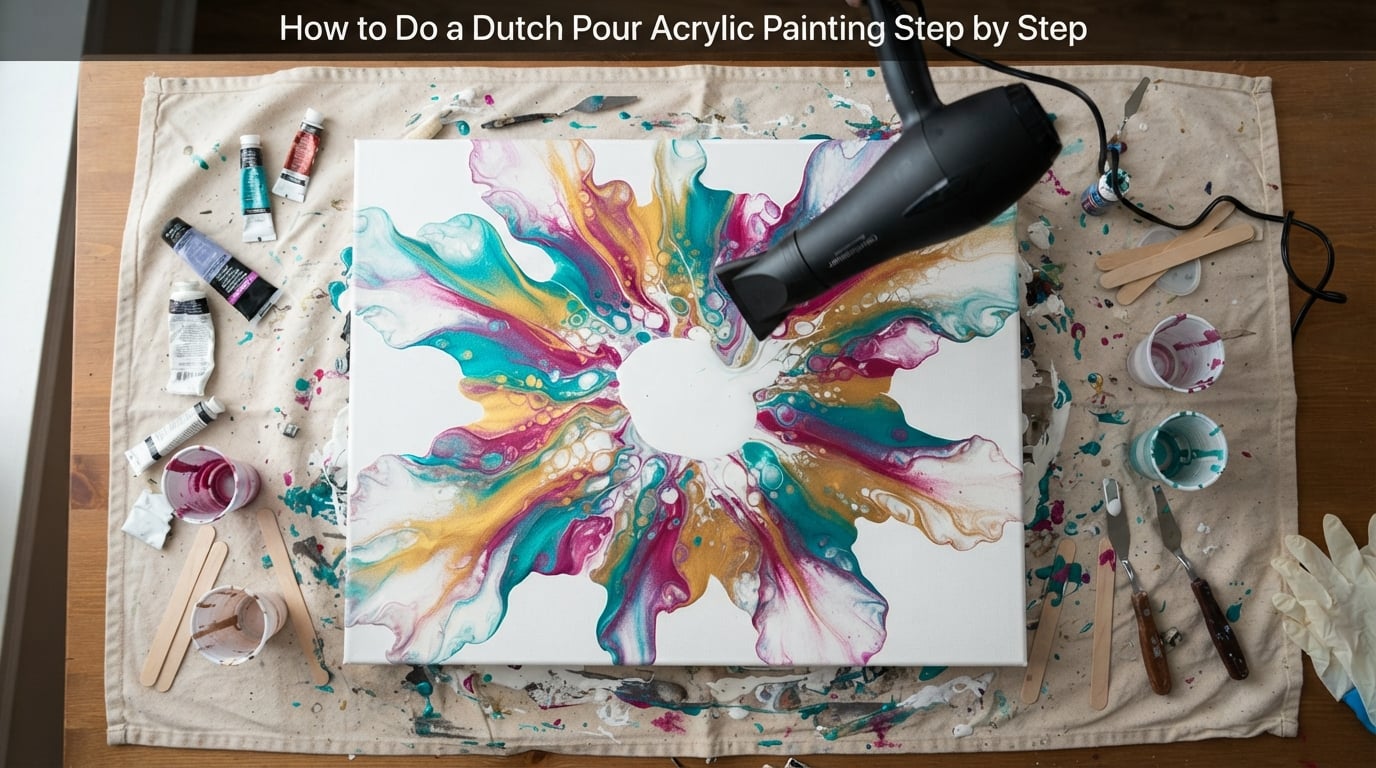
A Dutch pour is one of the most forgiving ways to create stunning abstract art, even if you have never picked up a brush. This technique uses bursts of air to push wet acrylic paint across a canvas, producing ribbon-like edges, organic cells, and lacing patterns that look far more complex than they are.
In this guide, I walk you through the exact process I use in my own studio: the supplies, the paint mixing ratios, six core steps, three popular variations, and the fixes for the most common beginner mistakes. Whether you are testing your very first pour or trying to fix muddy colors, you will find what you need below.
Quick Steps Overview (jump to the full walkthrough below):
1. Prep and prime your canvas with a base coat.
2. Mix each color to a warm honey consistency with pouring medium.
3. Layer paints in a puddle, line, or circle on the canvas.
4. Pour more base coat around or over the colors.
5. Blow air to push the base coat over the color layers.
6. Tilt, dry, and seal your finished pour painting.
Table of Contents
- What Is a Dutch Pour in Acrylic Painting
- Essential Supplies Checklist for Dutch Pour Painting
- Paint Mixing Ratios and Consistency Guide
- How to Do a Dutch Pour Step by Step
- Dutch Pour Variations: Puddle, Line, and Circle
- Air Blowing Tools Compared for Dutch Pour
- Creating Negative Space in Your Dutch Pour
- Color Selection and Combinations for Dutch Pour
- Drying, Curing, and Sealing Your Dutch Pour Painting
- Common Dutch Pour Mistakes and How to Fix Them
- Frequently Asked Questions
- Final Thoughts: Your First Dutch Pour
What Is a Dutch Pour in Acrylic Painting
A Dutch pour is an acrylic pouring technique where you use moving air to push wet paint across the canvas, creating organic ribbons, lacing, and cells rather than the round blooms you get from a dirty pour or flip cup. It was popularized by Dutch artist Rinske Douna, who used a blow dryer to send streams of paint flowing outward from a central puddle.
What makes a Dutch pour different from other fluid art techniques is the role of air. In a dirty pour, gravity and tilting do most of the work. In a Dutch pour, the air you direct at the wet paint creates long, sweeping shapes that no tilting alone could achieve. The base coat you pour around your colors becomes a vehicle: when you blow it inward, it drags the colors with it, leaving feathered edges and striking negative space where the base coat remains visible.
Dutch Pour at a Glance:
- Skill level: Beginner friendly
- Time to set up: 20 to 30 minutes
- Time to complete pour: 5 to 15 minutes
- Drying time: 24 to 48 hours touch dry, 1 to 2 weeks to fully cure
- Best canvas size to start: 16×20 inches
I love this technique because it gives beginners immediate visual feedback. The first time you blow air over a layered puddle and watch colors fan out in feathery ribbons, you will understand why fluid art communities on Reddit and Facebook are full of Dutch pour posts.
Essential Supplies Checklist for Dutch Pour Painting
You do not need a huge kit to start a Dutch pour. Most beginners can get going with nine core items, and several can be substituted with things you already own. Below is the supplies list I recommend, organized into must-have, helpful, and optional categories.
Must-Have Supplies
- Canvas or panel: A stretched canvas (16×20 inches works well for beginners), wood panel, or even a primed tile.
- Acrylic paint: Craft paint like Apple Barrel or Artist’s Loft works fine. Liquitex Basics is a step up in pigment density.
- Pouring medium: Floetrol is the most common. Pouring medium from Liquitex or DecoArt also works.
- Water: For thinning paint and rinsing tools.
- Plastic cups: For mixing paints. Disposable works best for easy cleanup.
- Stir sticks or craft sticks: For blending paint and medium thoroughly.
- Air source: Hair dryer, canned air, straw, airbrush, or small air compressor.
- Drop cloth or trash bags: This gets messy. Protect your workspace.
- Gloves: Acrylic paint stains skin and is hard to wash off for a day or two.
Helpful but Optional Supplies
A small torch or heat gun helps pop air bubbles that form on the surface after pouring. Silicone oil or treadmill oil encourages cell formation when you want those round color breaks. Paper towels or old rags handle drips while you tilt the canvas. A level surface or paint pouring stand keeps the canvas from sliding mid-blow.
For a deeper dive into choosing the right paint viscosity, my guide on how to thin acrylic paint for pouring walks through the consistency test in detail.
Paint Mixing Ratios and Consistency Guide
Paint consistency is the single most important factor in a successful Dutch pour. If your paint is too thick, it will not flow. If it is too thin, it will run off the canvas and your colors will turn to mud. The target consistency is what pourers call “warm honey” – it should ribbon off your stir stick in a steady stream, then settle back into the cup within a second or two.
Standard Recipe (works for most craft and student-grade acrylics)
- 45 percent acrylic paint
- 45 percent pouring medium (Floetrol or similar)
- 10 percent water
Heavier Body Recipe (artist-grade paints like Liquitex Heavy Body)
- 50 percent paint
- 40 percent pouring medium
- 10 percent water
Base Coat Recipe (thinner, used to push colors)
- 40 percent paint (usually white or black)
- 45 percent pouring medium
- 15 percent water
Mix each color in its own cup. Stir slowly for at least two minutes to avoid trapping air bubbles. A common beginner mistake is to mix in one big cup – you will lose the layered color separation that makes a Dutch pour beautiful.
How to Test Consistency
Lift your stir stick out of the cup. The paint should drip off in a continuous stream that disappears into the surface within 1 to 2 seconds. If it falls in blobs and sits on top, add a teaspoon of water. If it runs off like colored water, add more paint or pouring medium.
Forum users on Reddit’s PourPainting community often mention that beginners spend a full week getting this right. Give yourself permission to mix test batches on paper before pouring on your final canvas.
How to Do a Dutch Pour Step by Step
Below is the exact six-step process I follow for every Dutch pour. Once you have done it two or three times, the whole sequence takes about 10 minutes of active work.
Step 1: Prep Your Workspace and Canvas
Lay down a drop cloth or trash bags. Place your canvas on a raised surface (cups, small jars, or a pouring stand work well) so air can flow underneath. If your canvas is not pre-primed, brush on a coat of white or black gesso and let it dry fully.
Step 2: Mix Your Paints and Base Coat
Mix each color in its own cup using one of the recipes above. Then mix a base coat in a separate cup – usually white for bright colors, black for jewel tones, or a metallic like silver for drama.
Step 3: Layer Your Colors
Pour your colors onto the center of the canvas in one of three patterns: a puddle (all colors dumped in the middle), a line (colors poured in a stripe across the canvas), or a circle (colors layered around a ring). See the variations section below for specific instructions.
Step 4: Pour the Base Coat Around the Colors
Now pour your base coat around the edges of the color layers. This is the magic step. The base coat is what will be pushed over your colors to create those flowing ribbons.
Step 5: Blow the Paint
Set your air source to low or medium speed. Hold the nozzle 6 to 12 inches above the canvas and direct the air at the base coat, pushing it over and into the colors. Move in slow, sweeping motions, rotating around the canvas so the paint flows outward in all directions.
Stop when the design feels balanced. Leave some base coat visible for negative space. Less is usually more here.
Step 6: Tilt, Pop Bubbles, and Set Aside to Dry
Gently tilt the canvas in each direction to let excess paint run off. Pass a small torch or heat gun 6 inches above the surface to pop any air bubbles. Then place the canvas on a level surface in a dust-free area to dry for 24 to 48 hours.
Dutch Pour Variations: Puddle, Line, and Circle
Once you have the core steps down, you can change the look of your Dutch pour dramatically just by changing how you lay down the colors. Here are the three most popular variations.
Puddle Pour Variation
Stack all your colors in a single puddle at the center of the canvas. Pour base coat in a ring around the puddle. Blow outward from the center in all directions. This creates a flower-like or mandala effect with the colors radiating outward.
Line Pour Variation
Pour your colors in a thick stripe across the middle of the canvas (horizontally or diagonally). Pour base coat above and below the stripe. Blow perpendicular to the stripe to push colors into long, flowing bands. This produces landscape-like scenes and is great for galaxy or sunset pours.
Circle Pour Variation
Pour colors in a ring around the edge of the canvas, leaving the center empty. Pour base coat into the middle. Blow outward from the center. The base coat pushes colors toward the edges, creating a bullseye or eye-like design.
Each variation works with the same paint ratios – only the placement and direction of air changes.
Air Blowing Tools Compared for Dutch Pour
The air tool you choose will shape the kind of ribbons and cells you can create. Beginners usually start with a hair dryer because it is accessible and forgiving. As you advance, you may want more control. Below is a comparison of the five most common air sources.
Hair Dryer
The classic Dutch pour tool, used by Rinske Douna herself. A concentrator or funnel nozzle attachment gives you a more focused stream. Pros: affordable, easy to control, no learning curve. Cons: less powerful than a compressor, can overheat with extended use. Best for beginners.
Air Compressor
A small portable compressor with a hose gives you adjustable pressure and consistent airflow. Pros: precise control, professional results, works on large canvases. Cons: louder, more expensive, requires setup. Best for serious fluid artists.
Airbrush
An airbrush with a compressor lets you target very small areas with fine lines of air. Pros: extreme precision, great for detail work and tiny canvases. Cons: slow on large pours, requires practice. Best for tile-sized pours and detail refinements.
Canned Air
The pressurized air cans sold for cleaning electronics. Pros: no equipment, instant on. Cons: short bursts, gets cold quickly, propellant can sometimes affect paint surface. Best for small touch-ups and testing.
Straw
A regular drinking straw (or a silicone basting straw for more reach). Pros: free, no power, surprisingly precise. Cons: condensation and saliva can contaminate paint, very slow on large canvases. Best for small, controlled pours.
If you are starting out, the hair dryer is the easiest path. Upgrade to a compressor once you know you love the technique.
Creating Negative Space in Your Dutch Pour
Negative space is the area of base coat that stays visible between the flowing color ribbons. It is what gives a Dutch pour its open, airy feel rather than a busy, full-canvas look. Without negative space, your pour can look heavy or muddy.
To create strong negative space, start with a high-contrast base coat. White base with bright colors creates a clean, modern look. Black base with metallics or neons creates drama. The base coat must be more than just a primer – it is a deliberate design choice.
When blowing air, stop before the colors cover every bit of base coat. Leave visible patches around the edges and scattered through the center. Tilting the canvas gently toward you can pull color back from an edge if you have over-filled it.
Forum contributors on Facebook’s Acrylic Pouring Beginners group often emphasize that less is more. Most beginners blow too long and lose their negative space.
Color Selection and Combinations for Dutch Pour
Color choice can make or break your pour. The biggest beginner mistake is choosing too many colors at once – they blend into a brown-gray mess. Stick to three to five colors per pour while you learn.
Beginner-Friendly Color Combinations
- White base with teal, gold, and white (ocean look)
- Black base with magenta, teal, and silver (cosmic look)
- White base with burgundy, mustard, and cream (autumn look)
- Black base with copper, deep blue, and bronze (warm metallic look)
Color Theory Tips for Pouring
Complementary colors (opposites on the color wheel like blue and orange) create the most vibrant contrast and keep colors distinct. Analogous colors (neighbors on the wheel like blue, teal, and green) blend smoothly into a calm, unified look. Avoid putting pure red next to pure green or pure orange next to pure blue unless you want a muddy middle.
For metallics, layer them last so they sit on top and catch the light. A small amount of metallic goes a long way.
Drying, Curing, and Sealing Your Dutch Pour Painting
This is the section most online guides skip, and it is the one that protects your work long term. A Dutch pour that is not properly sealed can crack, fade, or stick to whatever it leans against.
Drying Timeline
- Touch dry: 24 to 48 hours (surface no longer tacky)
- Dry to handle: 3 to 5 days
- Fully cured: 1 to 2 weeks (paint has hardened all the way through)
Keep the canvas on a level surface in a dust-free spot. Avoid direct sunlight or a fan pointed at the surface – both can cause uneven drying or cracks at the edges.
Sealing Options
Spray sealant is the easiest. Two light coats of an acrylic spray varnish (matte, satin, or gloss) protect against dust and UV. Hold the can 12 inches away and apply in smooth, even passes.
Brush-on varnish gives a more durable finish for pieces that will be handled a lot. Use a soft, wide brush and apply in one direction to avoid streaks.
Resin coating creates a thick, glass-like finish. It is gorgeous on Dutch pours but more expensive and requires careful mixing and pouring. Reserve resin for finished pieces you really love.
Wait until your pour is fully cured before sealing. Sealing too early traps moisture and can cause cloudiness.
Common Dutch Pour Mistakes and How to Fix Them
Even experienced pourers hit snags. Here are the problems I see most often in beginner work, with practical fixes.
Colors Turn Muddy
Cause: too many colors mixed at once, or complementary colors blended too long. Fix: limit yourself to three to five colors, and stop blowing before they fully merge. Use a base coat color that gives them space.
Paint Cracks at the Edges
Cause: edges dried faster than the center, or paint was applied too thick. Fix: work in a room with steady temperature, avoid drafts, and keep paint layers consistent in thickness. A thin mist of water from a spray bottle can slow edge drying.
Cells Not Forming
Cause: paint layers are too similar in density, or no cell additive used. Fix: add 2 to 3 drops of silicone oil or treadmill oil per color cup, and ensure your white base is noticeably different in density from your color layer.
Paint Runs Off the Canvas
Cause: paint is too thin. Fix: add more paint or pouring medium to thicken the mix, and test on paper before pouring on your final canvas.
Air Tool Blowing Paint Off the Canvas
Cause: air pressure too high or nozzle too close. Fix: pull back to 8 to 12 inches from the surface, lower the pressure, and use smooth, steady motions rather than quick bursts.
Saliva Contamination with a Straw
Cause: blowing directly into wet paint. Fix: use a silicone basting straw that lets you blow without touching the paint, or switch to canned air for cleaner control.
Frequently Asked Questions
What is a Dutch pour painting technique?
A Dutch pour is an acrylic pouring technique that uses air – usually from a hair dryer or air compressor – to push a base coat of paint over layered colors. The result is flowing ribbons, lacing, and organic cells with visible negative space.
What materials do I need for Dutch pour?
You need a canvas, acrylic paint, pouring medium (like Floetrol), water, mixing cups, stir sticks, an air source (hair dryer, straw, or compressor), gloves, and a drop cloth. Optional supplies include silicone oil for cells and a torch for popping bubbles.
How do you mix paint for Dutch pour?
Mix each color in its own cup at about 45 percent paint, 45 percent pouring medium, and 10 percent water. The target consistency is warm honey – the paint should ribbon off your stir stick and settle within 1 to 2 seconds. Mix your base coat in a separate cup, slightly thinner than the color layers.
What is the difference between Dutch pour and dirty pour?
In a dirty pour, all colors are layered in one cup and flipped onto the canvas – gravity and tilting create the pattern. In a Dutch pour, colors are poured directly onto the canvas in a puddle, line, or circle, then a base coat is blown over them with air. Dutch pour produces longer ribbons and more visible negative space.
How long does it take for a Dutch pour to dry?
A Dutch pour is touch dry in 24 to 48 hours, dry to handle in 3 to 5 days, and fully cured in 1 to 2 weeks. Wait until the pour is fully cured before applying any sealant or varnish.
Final Thoughts: Your First Dutch Pour
A Dutch pour is one of the most rewarding ways to explore fluid art because it lets you create gallery-worthy results with very little gear and even less experience. The two skills worth practicing first are paint consistency and air control – once those feel natural, the rest is just creative choices about color, layering pattern, and how much negative space to leave.
Start with a small tile or a 12×12 canvas, pick three colors and a white base coat, and give yourself permission to make a few imperfect pours before you chase a showpiece. Each one teaches you something the next one will use.